Friday, November 28, 2008

Happy Thanksgiving!

By the time this hits the web, it'll be the day after Thanksgiving, aka "Black Friday." I spent the morning feasting with friends before going to the tower and doing it again. As was predicted, this year's Thanksgiving traffic was way down from last year's. For 2007, we counted about 1400 operations on Thanksgiving day. This year, we barely made 1100.

You've probably heard of the Thanksgiving ritual wherein this year's turkey receives a pardon from the president and gets to live happily ever after. This practice began in 1989 with the first President Bush. At first, the pardoned turkeys went to Kidwell Farm petting zoo at Frying Pan Park in Herndon,Virginia. Since 2005, however, the turkeys (there are actually two: the turkey, and an alternate, just in case of . . . whatever) have been flown to Disneyland, where they serve as honorary grand marshals in Disneyland's Thanksgiving Day parade. After the festivities, they become permanent residents at a Disneyland ranch. This year's turkeys, dubbed 'Pumpkin' and 'Pecan', came from Ellsworth, Iowa. After receiving their last-minute reprieve on Wednesday, the two lucky birds caught United flight 209 for their west-bound flight. Through the collaboration of the FAA, United used the callsign "United Turkey One" for this flight. The flight arrived about 5:30 pm, giving the birds plenty of time to rest up for their parade appearance the next morning.

Another recent noteworthy arrival was the Japanese Prime Minister, who stopped at LAX on the way to and from the APEC meeting in Lima, Peru, last weekend. We also had, I believe, the President of South Korea pass through on his way home. The flight from Lima to LAX is about eight hours, and they stopped here to refuel and refresh before continuing the twelve or thirteen hours across the Pacific. On a personal note, this is the second time I've gotten to work Japanese Airforce Zero Zero One (and Two: the prime minister travels with a spare 747!) The first time was a couple of years ago in Memphis, Tennessee, when the Japanese prime minister came to visit Graceland. President Bush came to town too, but I forget the occasion for them being in Memphis. I do remember being chagrined that the Japanese prime minister's planes had much better sounding radios than the president's.


Some unfinished business:


Previously mentioned, but not shown: a Skywest CRJ-900 operated for Delta. This route to Salt Lake City is the only Delta/Skywest we have at LAX. Mainline Delta also flies the route, usually with B757's or MD90's. With the demise of Express Jet earlier this year, this is also now the only Delta Connection service seen at LAX.

A Delta MD90, the first I've seen in the new paint scheme.

A US Coast Guard helicopter arrives at LAX. There are four USCG Dauphins based here - for now. The airport long-term plan calls for them to be relocated to make space for terminal and taxiway expansion.


And now, time for a couple of updates:

In the post about state capitals, I said that I had not recently noticed the United/Skywest flight to Oklahoma City. This past Saturday, I worked that flight on Ground Control, so it's still operating, and it's still in a CRJ-700.

In an earlier post about the A380, I said that LAX had four gates that could accommodate the jumbo Airbus. We now have six: Two at the International Terminal, and four of the remote gates at the west end of the airport.

As hoped for, the American Eagle Saabs have disappeared from the LAX scene. They all flew out in the course of the first week of November. So far, they've not been replaced with anything else; their routes are either being serviced with E135's or no longer being flown. I don't think we've gotten more E135's either, so flight frequency has probably been trimmed.

The American Eagle terminal at LAX, referred to by controllers and pilots as "the Eagles Nest", or just "the nest". The good news: no Saabs! The bad news: awful lot of empty gates.
This facility too will go away under the LAX long-term plan.
Link

Note: I didn't make up the stuff about the turkeys. See this:

http://www.infoplease.com/spot/tgturkey2.html

Monday, November 24, 2008

Fire burn, and caldron bubble. (The Fifth Gear Chronicles, part 3)

Previously on View from the Tower . . . the Jetta fifth gear swap that went pop, the tug got a new set of rubbers, and the loaner car that didn't go. Can our hero wield his magical metric crescent wrench and save the day? Stay tuned for our exciting conclusion!

As you may recall from episode one of this saga, I had ordered new pieces for the Jetta's fifth gear synchronizer cluster from the local VW dealer. Delivery time was quoted as two days. but it actually took three. Meanwhile, I reopened the transmission to finish the job of removing the existing gear set, which is where the job had stopped after the discovery of broken bits. There was still the challenge of the selector gear, which had obstinately rebuffed all efforts at removal. Having broken my modified el-cheapo gear puller in the first episode, I now borrowed a (hopefully) better puller from airport buddy Bill. You may remember Bill from the tug tire story, where his pneumatic impact wrench proved insufficient for the immovable bolt. Bill is a race car guy, and at present is working on a pair of midget cars - one for dirt track, the other for paved.

Bill's puller looked promising; its arms fit into the slots on the selector gear, which had been the beginning of my gear puller's difficulties. Nonetheless, I made sure to make another generous application of penetrating oil before getting started. The threads of the puller got a dose of heavier oil for lubrication, a trick I learned from long-time car buddy Roger. Besides being of better construction, Bill's puller had another difference from mine: it didn't have wrench flats on the bolt head, but rather a sliding handle like the ones seen on C-clamps. I snugged it up on the gear and started tightening it up. Once it was tight, the thumb handle made it a lot harder to increase the tension compared to using a wrench, and progress was slow. I thought I was finally making progress when I felt a little snap in the handle. A couple more turns, however, and the puller started wanting to cock over to one side. So I backed off and reset it for another try, taking greater care to be sure everything was centered and straight. Once again it wouldn't stay straight. When I pulled it off this time, I saw that the bolts holding the puller together had bent; all four were slightly V-shaped. I took it apart and then reassembled it using AN3 aircraft bolts (and thereby probably doubling its value). Once again into the breech! Well, something like that anyway. However this time, the puller stayed straight - right up to the moment that it snapped. There was no mistaking it: I'd broken Bill's puller too. The bolts had held, but the arm links had not - each side had failed at the bolt holes.

Pieces from Bill's gear puller on the left, the rebuilt puller on the right.

By now I figured I owed Bill a new puller anyway, so I disassembled it again and borrowed the somewhat heavier links from my broken puller to cobble it back together once more. More penetrant on the gear, more oil on the threads, and I was ready to give it another shot. But this time I upped the ante: once the puller was on and the gear was under tension, I got out the propane torch and gingerly applied heat to the gear. Using a torch to heat up machined parts is an accepted practice and sometimes necessary, but I'm always reluctant to do it for fear of damaging something. This was what the doctor ordered though - the snap I felt this time was the gear moving. I had to reset the puller again to finish the job, but I finally had the selector gear in my hand.

Compared to the selector gear, the two gears themselves were pretty easy. I did have to employ the rebuilt puller again, but the torch wasn't needed. After a week of being stalemated, I had finally gotten the first half of the job done:

Look ma - no gears!

Putting in the new gears went smoothly, but that brought me back to the selector gear and the synchronizer. Remember those loose pieces in the pan way back in the first installment? I now had to figure out how to get them back in correctly, which I obviously hadn't managed to do the first time around. Since I was still waiting for the parts to arrive at the dealer, I spent one whole evening researching how those pieces were supposed to go together. It seems I was not the first to have this problem. The problem was compounded by VW's redesigning these parts after a year or two of production.

These were the easy parts. Look at the first picture in the first installment to see the hard ones. These are the new gears; if you look closely at the gear on the right, you can see that the one in this picture is slightly smaller than the one in the first picture: Compare where the gear teeth are in relation to the big washer that holds the gear in place.

This redesign problem became more apparent when the ordered parts arrived. I realized that I had received revised parts, but did not have a revised transmission. The new parts would have to be unrevised to work with the existing stuff. Fast forward through another hour or two with pliers, cutters, bench grinder, and files. I was now faced with getting the reassembled selector gear and synchronizer back into the transmission. The selector gear was no more willing to go on than it had been willing to come off. The instructions I had did say that the factory used a press to put it together originally, and that it would have to be driven on. My first attempt at this did not seem promising, so before I got too committed I pulled it off and took stock. Time for the torch again.

Since the first application of the torch, I'd found my no-touch thermometer, a nifty little gadget that can determine an object's temperature from several feet away. So armed, I felt more secure heating the gear up for reinstallation. I don't remember how it happened, but part way through this process I was distracted by something, and when I looked back I realized that I had heated one of the retaining springs to a dull orange. This was one of the same pieces that I'd spent an hour or so revising in the previous paragraph. For those who don't already know, a good way to ruin a metal spring is to heat it to the point that it loses its temper - it becomes brittle and all the springiness is lost. Fortunately I'd ordered a spare. Unfortunately, it would also need the unrevising procedure; back to the grinder.

By the time that was done, it was too dark to continue, so another day gone. Meanwhile, I was still at the helm of Dick's airport car. It being dark, I spent a little time on the wagon's lights, as Dick had told me that it hadn't any headlights. I managed to get the low beams to work, but selecting the high beams produced a severe absence of light. Oh well, at least that was enough to get home with. A few other bulbs also needed attention, after which I made it home without incident.

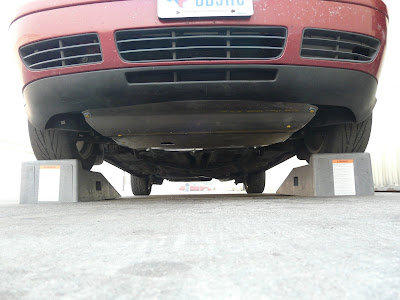
The next day, having remembered to disconnect the airport car's battery and thus avoid a repeat of the no-start episode, I was back at it and managed an uneventful reassembly of the Jetta's transmission. I hadn't liked the way the Redline MT-90 oil had felt when shifting, so this time I filled the transmission with the slightly thinner Redline MTL. Once the transmission was all buttoned up, I took a test drive around the airport. The shifting action felt better, so there was one small victory. After checking for leaks, I took it out on the road. I held my breath the first time I went for fifth gear, but it went right in. The first downshift was another tense moment, but it did just fine. Phew! A few more enroute back to the hangar, where I then installed the engine bay side panel and the new aluminum belly pan, which looks and acts more like a skid plate on a four-wheel drive truck. No more worrying about road debris holing the oil pan! (A common issue on this generation of VW's, which use cast aluminum oil pans.)

All done! The Jetta shows off its new Dieselgeek skid plate.

In the subsequent week, the car has driven well. The new fifth gear drops engine rpm's by eleven percent, as compared to the original. This produces about 65 mph at 2000 rpm, whereas the original fifth gear gave about 60 mph at the same revs. I don't expect any noticeable change in fuel economy, but the car seems a little happier and quieter on the freeway. I'm guardedly optimistic that I got it right this time, but I'm ordering another set of the bits and pieces from the dealer just to make sure (a complete set of revised bits and pieces this time). Having them on hand should guarantee that I'll never need them. Let's hope so, since the acid test will be next month's road trip. Better renew my AAA . . .


Postscript: This entire ordeal would have been even more trying if not for the help from the several named airport buddies. Thanks again to Kenny, Bill, and Dick. Kenny's explanation of 220 wiring was eye-opening. Bill conceded that he'd broken his puller before I'd done so, and kindly accepted it back in its repaired condition (along with a case of Coke Zero -his favorite). Once the Jetta was restored to operational status, I spent a day fixing Dick's airport car. The main electrical problems of battery drain and overcharging both went away after the alternator was overhauled. My diagnosis of a bad voltage regulator was spot on (even I get lucky every now and then). The mysterious motor that I unplugged turned out to be the power antenna, which is mounted in the fender next to the HVAC housing. I was surprised to find that I got over 18 mpg out of that car - who'd a thunk?

The titles for episodes One and Three come from the three witches in Act 4, Scene 1 of "The Scottish Play" (Shakespeare's M@cb*th).

For those of you who are tired of this story of my mechanical ineptitude, I'll admit that I'm getting sick of it too - When I began, I had no intentions of beginning a trilogy. Stick around: I promise next time we'll get back to the big airport.

Wednesday, November 19, 2008

The airport car strikes back! (The Fifth Gear Chronicles, part 2)

After all of the excitement in the last episode, I needed a little time to get around to this installment (okay, I had to go back to work). Those of you who think you want to be professional writers ought to first try keeping a blog. Even done semi-regularly like this one, it's a lot more work than it seems like it would be. When I left off, the Jetta was immobilized, waiting for parts, the Clarkat was smoothly rolling on its new front tires, and I was driving Dick's 'new' airport car.

The next morning, I went out to run some errands and found that the airport car wouldn't start - not even a click - the dash warning lights just went out and stayed out when I turned the key. Flashback to the previous day, when Dick had loaned me the car along with a wrench to disconnect the battery. The other electrical quirk he mentioned was that the voltmeter sometimes went full scale, indicating around 18 volts. Oh, and he didn't think the headlights worked. While I had been chasing the parts for the VW, I stopped at a parts place that does battery and charging system testing. When I opened the hood in preparation for the guy to come out with the equipment, I heard a motor running. As the car was off and the key in my hand, this didn't seem right. Some of today's cars have electric radiator cooling fans that can keep running even when the car is shut off, but this Caprice isn't one of them (for what it's worth, the Jetta is). Poking around, I thought it might be the air conditioner blower motor, but I unplugged it with no effect. But I was in the right area - the noise was definitely in the vicinity of the HVAC unit on the firewall. The tester guy hadn't showed yet, so I poked around a little bit more, unplugging and replugging convenient electrical connectors. One of them did the trick - the noise stopped. I didn't know what it was, but I suspected that I had found the source of the battery drain.

According to the tester guy, the battery and charging system passed the test with no problems. I had observed that for the duration of the test, the car's voltmeter indicated exactly where it ought to, in the 12 - 14 volt range - naturally. As I drove away from the parts store, the needle went all the up to 18 again. No problems - yeah. Mindful of Dick's warning about the headlights, I made sure to be home before it was absolutely dark. Thinking that my unidentified connector had solved the battery drain problem, I left the battery connected when I parked the car for the night.

As I mentioned, the next morning the car showed no desire to start. Apparently my mystery plug wasn't all that was wrong. I had considered this possibility the night before, and so I brought home from the hangar what I call my 'jump box' - commonly known as a booster battery - a self-contained battery with built-in jumper cables. I hooked this up only to discover that it didn't have enough oomph to crank the Chevy's carbureted (!) V-8 long enough to get it started (yeah, that was a shocker - I never would've believed that a 1990 car with California emissions would be equipped with a carburetor).

Dead battery, dead jump box. Hmmm. Oookay, now what? I know - I'll jump it off the motorhome . . . I hope I've got a set of cables in the motorhome! Sure enough, I found a set. Hooked them up to the motorhome battery and the car, and . . . nothing. You gotta be kidding me - the motorhome battery's dead too?! The full moon's still a day or two away - What's going on here?!

Putting the car on hold for the moment, I tried to start the engine in the motorhome (another carbureted Chevy V-8, but even bigger). Nada. The motorhome's been plugged into shore power for months now; why is this battery dead? Because the shore power keeps the motorhome's house batteries charged, but not the engine battery - that's why. However, one nifty feature that this motorhome has is an Auxiliary Start switch, which is essentially a built-in jump start feature that lets you start the engine using power from the house batteries. Finally - got something started! Being in the mood to start things, I also fired up the motorhome's generator to let it get some exercise. The cats hated all this, as the noise and vibration of the engines running made them sure that we were about to hit the road; thus they were all hiding in and under the bed. Meanwhile the commotion got my next door neighbor out of bed, where I guess he'd been hoping to sleep in past eight in the morning. No such luck - my generator is about 18 inches from the side of his motorhome.

Now that the motorhome was running, I made another attempt at jumping the car. This worked better - the car cranked for a few seconds before I saw a spark and a puff of smoke from one of the battery terminals. I got out and checked everything, fearing that I had hooked something up wrong. But no, red was positive and black was negative at both ends. Nonetheless, the car wouldn't crank again.

Now those of you who've experience with Lucas electrics already know what's wrong here: I let the smoke out. I don't care what all the scientists and engineers say about electrons, protons, neutrons, positrons, gravitrons, magnetrons, and all the rest; the principal of electricity is quite simple: Electrical systems work on smoke - If you let the smoke out, they quit working. The funny part about this whole story is that Anglophile that I am, there's not a single piece of British equipment involved.

By now, I'd made several attempts to call Dick, whose drive to the airport would take him right by me. No early riser he, I'd left a message around 9:30 and kept working on the no-start situation. Continuing on, this time I hooked the jumper cables up to the motorhome house batteries. I know those work . . . well, they did. But not on the car - still nothing. I took a break to consider my position. The car battery is dead, as is the jump box (whose charger I thoughtfully left in the hangar). The motorhome battery won't fit in the car, nor vice versa, thanks to the car's use of those stupid GM side terminals (I hate those, by the way). I went and fiddled with the jumper cables one more time, and noticed that I wasn't even getting a spark when I made the connections. So I tried shorting the clamps together - still no spark, and there sure should've been. Close examination of the clamps revealed that the spark and puff of smoke that I'd seen earlier was one of the cables burning through at the connection to the clamp - there was a good quarter-inch gap between the end of the wire and the place where the terminal had been. No wonder!

Finally, having run out of better ideas, I got out the bike and put on my backpack. I figured I'd ride over to the hangar, where I had a couple of battery chargers, the charger for the jump box, and another set of jumper cables. On the way out the front gate, I realized that the bike's rear tire was low. Not again! I returned home and got out the bike pump that I'd bought after the last flat. Time for it to stop taking up space on the counter and earn its keep. Having pumped up the tire, I figured I might as well mount the pump on the bike where it belonged. No big deal, all I needed was a metric allen wrench - which, amazingly, I already had on hand. As I was attaching the pump to its bracket, the phone rang. Yes, Dick could stop by, and yes, he had another set of jumper cables. Being it was his car, naturally it started right up once we'd hooked up his cables. He followed me over the hangar, where I put it on the battery charger.

So much for Part Two. I hadn't meant for this tale to become a trilogy, but I guess the Star Wars thing rubbed off on me. Of course, Douglas Adams managed to make trilogy into five parts . . .

Saturday, November 15, 2008

Double, double toil and trouble (The Fifth Gear Chronicles, part 1)

I'm writing this to the acrid smell of smoke as ash falls outside like a light snow. The LA basin is surrounded by a ring of fires that have broken out over the last 48 hours. Here in Long Beach, visibility is limited to about three or four miles because of the smoke. Most of the afternoon has felt like twilight; by around three this afternoon, it got sufficiently dark that street lights started coming on. There was to be an airshow at the Long Beach airport this weekend, but I heard it may have been cancelled. Besides the poor visibility and lousy air quality, several of the aircraft that were to be on display are hard at work this weekend fighting the fires.

Local time about 3:30 pm. That's not an overcast, it's smoke.

There are no clouds in this picture: the varying colors are layers of smoke at different altitudes, from different fires . At nine in the morning, we had clear blue sky - you could clearly see the mountains. What you probably can't see in this picture is the heavy jet on final for LAX - but it's there.

Ash on the windshield of the car. This is about 30 minutes' accumulation.

I've had a couple of days off this week, due primarily to the fact that I requested them over a year ago when we bid vacation time last year. I had nothing particular in mind at the time I requested them (good thing, as you'll see); I just saw an opportunity for a four-day weekend. Those who know me already can see what's coming: another tale of a project gone awry. In this case, the two-hour project that became the two-week project!

In short, the whole point of this undertaking was to install a taller fifth gear in the Jetta to reduce engine rpm's at highway speed (from a .756 to a .681, if you're interested). The VW transmission is designed such that the fifth gear set can be accessed without completely disassembling the transmission; swapping the fifth gear is a common modification. At over 200K miles, it might seem a little late to be getting this done, but I've got no plans to replace this car anytime soon. I've had the parts for several months now, awaiting the opportunity to do the work. Also, despite the apparent ease, I was a little hesitant to attempt working on a transmission (and a perfectly good one, at that). I consulted several sources for instructions and any other 'nice to know' information to reassure myself that I was going to be able to get this done successfully.

The first attempt was two weeks ago, during my last two-day weekend. I won't regale you with all the steps involved, but will cut straight to the part where the gears are removed. The first gear that has to be removed is, naturally, also the most difficult. All the instructions and such had (I thought) prepared me for this. The job requires a gear puller - no big deal. Except that none of the pullers I had would fit; the arms
were too wide and/or the tips too fat. So I took one of them apart and 'adjusted' it with a buddy's bench grinder (gotta love a good bench grinder). That worked great - until I broke the gear puller. The nice thing about cheap tools from Harbor Freight and the like is that you're not afraid to grind, bend, or otherwise modify or destroy them if necessary - they're pretty much disposable. The not-so-nice thing about cheap tools from places like Harbor Freight is that they don't always get the job done before they break.

That was the end of attempt number one. Running out of time, I reassembled the car so that I could go to work. On the way home, the transmission occasionally showed an alarming disinclination to shift down from fifth into any other gear - I could get it out of fifth, no problem, but not into any other gear. It would happily go back into fifth, though. Subsequently, it sometimes decided it wouldn't shift up into fifth - the gate just wasn't there. While I had refilled the tranny with a different synthetic oil (Redline MT-90, for those of you planning on duplicating this endeavor) than what I'd drained out of it (VW g50), I was pretty sure that wasn't the root of this development.

The second attempt started this past Tuesday. Upon removing the transmission end cover, I found loose bits and pieces in the bottom of the pan - uh oh. That certainly explained the shifting problems - these bits and pieces came from the selector gear and synchronizer assembly. Here's what I saw first:


And then this:


In case it's not obvious what the problem is, here are a couple of close-ups:

These three little dogs in the picture below fit into the three little slots in the big gear on the left that you can see in the top picture above. The wire bits in the upper picture were the spring clip that holds them in place.

At this point, I knew that this was no longer a 90-minute job. Fortunately, I had a couple of days before I had to be back at work. Also fortunately (perhaps), airport buddy Dick had just acquired an airport car that I was welcome to borrow.

For those not familiar with the concept of an airport car, let me explain: An airport car is a spare car, usually an old beater, that you keep at the airport for those times when you have a plane, but no ground transportation. I used to have a sort-of airport car that lived on my parent's farm - it was mine to drive when I was in town, and the rest of the time it was the farm hack.

As you may have gathered from my description, an airport car usually has a few, umm, "quirks" shall we say, that give it character. At the time of this story, Dick had only had his "new" airport car for a few days. He did warn me that something drained the battery when it was parked, and he even gave me a wrench to use for disconnecting the battery cable when it was going to be parked for more that a couple of hours. The white station wagon in the picture below is said airport car:

The airport car: a 1990 Chevy Caprice Classic Station Wagon. Seats nine. What a tank!

I spent much of the rest of the day chasing down (ordering) the parts for the Jetta and then finishing up another project: The replacement of the front tires and wheels on the orange Clarkat tug. When I bought this tug, it had apparently previously been used as an indoor warehouse tug - the main differences being that it had been converted to run on propane and that it had solid rubber ("cushion") front tires. Propane is preferred over gasoline or diesel for indoor equipment because it's cleaner and safer. These days, electrics are preferred over propane for indoor use. Cushion tires are common on equipment that is used on very smooth surfaces like warehouse floors; they don't do well on most outdoor surfaces, such as asphalt, concrete, or especially gravel. The Clarkat's cushion front tires have started coming apart to the point that any time I take the tug out, it leaves a little trail of rubber shards to mark its path. The ride has also become a series of jolts as each hole and flat spot in the tires made itself known as they went round. Imagine the sensation of your car having one front wheel that is a pentagon, the other an octagon, and then driving down a washboard road. Or riding a horse with all its legs different lengths - on an escalator.

The old right wheel - you can see how it's coming apart. The stuck lug bolt is the one at four o'clock, surrounded by blackened paint.

Forklifts and most other equipment with cushion tires are specifically engineered to use cushion tires, and cannot easily be converted to use pneumatic tires. The front of the later (post about 1960, if I recall) Clarkat models however, are designed to use either. As such, the conversion itself is simple: the cushion tires and wheels are removed and the pneumatics bolted on in their place. The cushion and pneumatic tires do not use the same wheel, which requires replacing the tires and wheels together. I had managed to pick up a set of pneumatic tires and wheels from a local forklift company last month in preparation for the conversion, and had in fact started the conversion then with the replacement of the left front tire and wheel. The right side, however, had one lug bolt that absolutely refused to budge. I have a Dewalt electric impact wrench of decent power that has up till now been adequate for any lug nut or bolt sort of job. It was utterly powerless when confronted with this one particular bolt. Mind you, it had already removed all the bolts on the left wheel and all the other bolts on the right. I got out my 24-inch breaker bar, and found that with it I was able to turn the whole wheel while the tug was still sitting on it - but the bolt didn't move. I applied a liberal dose of PB Blaster to both ends of the bolt and called it a day.

The next time I tried the bolt a was a couple of days later, after several intervening applications of penetrating oil. I was still able to rotate the wheel while it was sitting on the ground. I next got a large C-clamp and put it on the wheel in much the same fashion as the police "clamp" the wheel of a car with excessive parking violations. I hope it works better for them than it did for me; using the breaker bar I was still able to rotate the wheel, even over the clamp. More penetrating oil was applied to the bolt, and I put it away for another day. Somewhere along the line, I'd also tried heating the bolt with a torch and then hitting it with a cold aerosol; no change - except that I'd burned the paint around it.

A few days afterwards I mentioned my dilemma to airport buddy Bill, who was sure that his heavy duty industrial strength pneumatic impact wrench would have that bolt out in no time at all. It didn't, much to his chagrin. Meanwhile, I'd been thinking about how to keep the wheel from turning when I applied the breaker bar to the bolt. After thanking Bill, I went to see airport buddy Kenny. I proposed my idea of a long arm, made out of angle iron perhaps, that could be bolted to the wheel using a couple of the operable lug bolts. This arm would need to be long enough to jam against the front of the tug's frame and thus prevent the wheel from turning any further. Kenny and I discussed a couple of other possibilities before I parked the tug again (after shooting some more penetrant on the bolt).

The next day, or maybe it was the day after that - I forget now, I went to a metal supply place and poked around in their scrap bins for some likely looking pieces. They sell it by the pound, but you have to buy the entire piece. They will cut it for you after you buy it, and in my case the cutting charge was more than the material. I had to have them cut it though, as it wouldn't fit in the car any other way (this was maybe a week before the Jetta immobilization project first began). I constructed a cardboard mock-up to see what size the pieces would have to be and determine a few critical measurements. I made some small cuts with my die grinder, but for the big straight cuts I would need a chop saw. That had to wait for the next day, when I was able to use one at one of the airport buddies'. After that, a little bit of grinding and fitting, and then it was back to Kenny to get it welded up. He suggested a change that I adopted: Instead of having it jam against the frame, it would jam against the ground. This would be more secure and more stable, while allowing a better angle of approach for the breaker bar - the whole thing would act like a scissor, with the breaker bar acting towards the arm instead of away from it. Meanwhile, more penetrating oil on the bolt. By now I'd used up the can of PB Blaster, and was making do with Liquid Wrench or some such.

The arm, shortly after its completion. I used the old left wheel as a jig to hold the parts in position for welding.

That brings us up to last Tuesday (remember last Tuesday - bits in the transmission?) After getting the parts on order at the VW dealer (nobody else wanted anything to do with it) I got back to the hangar and decided to try out my special tool. Ironically, I had to jack up the front of the tug enough to spin the wheel to the right spot for attaching the arm. Once it was on, I tried again with the breaker bar. The arm held the wheel and the bolt held firm, so I got out my cheater pipe and slid it over the breaker bar, thus making the breaker bar another foot or so longer. This didn't seem to be enough either at first, but using my leg on it did the trick - I heard and felt a sudden snap. Kenny and I had discussed the possibility of shearing the head off of the bolt, and I thought that's what had happened. But no, it was still intact, and grudgingly turned after further application of the breaker bar. Once I had it out, there was still no indication of what had kept it from turning: the threads weren't badly corroded or mangled, and it hadn't been cross threaded. But who cares? It's finally out. The rest of the job went quickly. I didn't use that bolt again (I'd gotten spares with the new tires and wheels - good thing), and just to be safe, I put some anti-sieze on all the bolts during reassembly. At least that job's finally done - a one-hour project that turned into a month-long project!

The arm in action, with the breaker bar and cheater pipe in place, and the impact wrench at the ready.

Mission accomplished! The new pneumatic tire and wheel installed and ready to go.

Here's another look at the old tires: Not much cushioning going on here!

And here's the offending bolt, with no obvious signs of distress.

One final bit of irony: While in Memphis, I had almost a complete set of spare parts for this tug, in the form of another one that I got from a salvage yard. The only work I ever did to that tug was installing a pair of brand new pneumatic front tires and tubes. In the rush to get out of Memphis, I sold it to a Fedex pilot - for about what the set of used tires and wheels for the orange tug cost!

It occurs to me (mainly because it's bedtime) that while the story's not over, this is enough for now. Stay tuned for more in the exciting saga: The airport car strikes back!

Tuesday, November 11, 2008

Veterans Day Salute

It's Veterans Day, and in honor of our Veterans I'll show you some of them in action as they've passed through LAX. With the exception of the Coast Guard helicopters based here, we don't often get military aircraft into LAX; with all the military bases in southern California, there are easier places for them to operate in the LA area.

The most recent military operation we've had was over the weekend, when a flight of T-38's spent the night here after performing a fly-by for the Veterans Day parade in LA. I didn't get any shots of their arrival as it was after sundown and busy at the time. These shots are of their departure the next day:

I apologize for the poor quality of these photos, but maybe these next few will give you an idea of what I was up against, shooting from the catwalk of the tower twenty stories up:
Wind 29 knots, gusting to 38!Whitecaps!
Sandstorm on the approach end of the south complex


Here are a few other military ops I've seen here:

After the Coast Guard helos, this is the most common military aircraft seen at LAX, often in tandem with a VIP movement: a C-5A Galaxy arriving on runway 24 right, as shot through the tower window and shades.

A rarity anywhere in this country: A Royal Airforce (callsign: Ascot) VC-10 departs LAX.
At first glance, it's a DC-9 or B727, but bigger than either and has four engines on the tail.

I'm used to seeing C-17's flying out of Long Beach, where they're built, but here's one at LAX. This one was also flying for the British Royal Airforce.

This F/A-18 is Canadian.


Sadly, not all of our veterans make it home unscathed. LAX periodically sees the arrival of a Fallen Soldier:
My thanks to all of our veterans - You're all heroes in my book!

Saturday, November 8, 2008

Where can we go from here: State Capitals

Time for the oft-promised and delayed continuation of the "Where can we go from here" series. This time, I'm going to take a look at who goes to which of the state capital cities. Service to the state capitals is hampered by the fact that many states' capitals are not located in one of their larger cities. In fact, some of them are in cities which are for the most part unknown to non-residents. As examples, I'll cite Frankfurt, Kentucky; Jefferson City, Missouri; and Carson City, Nevada. Shockingly, there is no direct service from LAX to any of these. In fact, this has almost become a study of "Where we can't go from here: State Capitals"; of the fifty state capitals, only thirteen can be reached non-stop from LAX.

Phoenix, Arizona, is one of the better-served state capitals. Southwest, United, and US Air (nee America West) all operate regular flights to and from Phoenix. The United and US Air flights are often flown by their regional partner airlines, Skywest and Mesa, respectively. The US Air service was flown by America West prior to their merger earlier this year. The flight usually runs just under an hour. Because Phoenix is so close nearby (in jet terms) and pretty busy (it's a US Air hub, and Southwest has a strong presence there too), there is often a flow control program for aircraft going there: we have to call and get a "wheels up" time for each of our Phoenix departures to ensure that there's a hole in the line for them. This rarely delays them more than fifteen minutes (and there's an incentive for us to keep the delays at less than fifteen minutes: beyond that they become 'countable' delays).
A pair of Mesa (callsign: Air Shuttle) CRJ's. Above is a CRJ-900 at gate 10 next to a B737-300. Below, a CRJ-200 pulls into gate 6 with an A321 next door.

Sacramento, California, currently home of the "governator", is also about an hour away, but there's never any difficulty with traffic restrictions. Skywest flies the route for United, using CRJ's. Southwest also goes into Sacramento from LA. You'll see Skywest RJ's later on.


Denver, Colorado, gets great service from LAX: We have four airlines that go there on a regular basis. Frontier and United both operate hubs in Denver; I've seen just about every type United operates on this route. At the moment, Denver is the only direct destination for Frontier out of LA. American and Southwest also offer service into Denver. Flight time runs 1:45 to two hours.


Atlanta, Georgia, being the busiest airport in the country, not to mention the home of Delta, gets regular service from LA. Besides Delta, AirTran also flies from here to their hub in Atlanta. Flight times are four hours or a little less. Delta has run nearly everything on this route, but AirTran only uses their B737's; I don't think the B717's have enough range and payload to make it worthwhile. When AirTran first started flying into LAX all they had were the B717's, and they went from here to DFW. The non-stop to Atlanta came later, when they got their B737's. For a short time, until they got the 737's, AirTran contracted with Ryan Air to fly the route for them, using Airbus A320's. I wish I'd gotten a picture of one of those, since they've long since gone elsewhere and been repainted.


Honolulu, Hawaii, is served by the widest range of airlines from LA: Six different airlines fly this route, and each of them a couple of times a day. American, Continental, Delta, Hawaiian, Northwest, and United all currently use B757's and B767's. Not surprisingly, flight times are all about the same, at around five hours and fifteen minutes. I can remember when Hawaiian used DC10's and Amtran used Tristars, but no more.


After Honolulu, it's not nearly as exciting to talk about Boise, Idaho. It's not as exciting to go there either: From LAX, you've a choice of Horizon's Dash 8's or Skywest's CRJ-200's. Horizon flies for Alaska out of LAX, and their flight time for this route is right around two hours. The Skywest CRJ's fly for United, and they're about twenty minutes quicker.


Indianapolis, Indiana, gets passenger service from Northwest and cargo service from Fedex. Either way, the flight takes about three and a half hours. During the summer a couple of other airlines also went from here to Indy; maybe again next summer? We can only hope.


Boston, Massachusetts, my mother's home town, gets several flights a day via American and United. Flight times hover around five hours. Boeings predominate on this route, although I have seen United slip in an Airbus from time to time.
A pair of heavy Boeings: An American B767-200 and a United B767-300.
Although it's not easy to see, the -300 is longer; compare the distance from the nose wheel to the wing root.

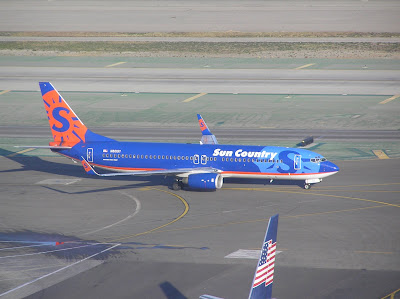
St. Paul, Minnesota, gets regular service thanks to sharing the airport with its neighbor Minneapolis. Northwest has their big hub there, and I've seen them use short Airbuses, B747's, and everything in between. Sun Country also goes from here to MSP, using B737's. Flights run around three hours, give or take.


United offers service into Oklahoma City's Will Rogers World Airport using Skywest CRJ-700's. Flight time is about two and a half hours. Come to think of it, I haven't noticed this flight go out within the last week or two, but I'm including it here anyway.


Nashville, Tennessee, is served by both American and Southwest. Both use B737's and have flight times around three and a half hours. Amazingly, I don't seem to have a picture of SWA and AAL B737's together; gotta work on that.

Austin, Texas, gets flights from American, Southwest, and United. American uses MD80's while Skywest operates CRJ-700's for United. Flights run about two and a half hours.


Salt Lake City, Utah, is a Delta hub, but also gets service from Southwest and United. Skywest flies the United flights using CRJ-200's and CRJ-700's. Oddly enough, Skywest also operates Delta Connection flights to SLC out of LAX. This creates the paradox of having two Skywest flights with different parent airlines' paint schemes going to the same place at about the same time. New ground controllers at LAX sometimes get surprised by the Skywest that doesn't park where all the other Skywests do. After a couple of times they figure it out (usually) because the flights operating for Delta, besides being painted in Delta colors, also have a different range of flight numbers (the Delta Skywests are usually in the 4000's, while the United Skywests are usually 5000's and 6000's. Usually). Another clue is that the Delta Skywest is often in a CRJ-900; Skywest doesn't operate -900's for United at LAX.
It figures - after all that blah about the Delta Skywests often being CRJ-900's, all I have is a picture of one that's in a -700. The -900 is longer, and can be identified by the two emergency exits over the wing; the -700 only has one; check the -900 in the first Phoenix photo above.


As I mentioned in the opening, this has become just as much a study of where you can't go from here: I counted eighteen states that receive no direct flights from LA at all. I'm not going to make a list of them here; I've been trying to avoid this whole topic becoming one great big list. A US map showing the affected states would've been nice, but the idea just occurred to me and it's already taken a week to put this together. For that same reason, most of the photos will have to go without captions - just imagine that each one has its own pithy remarks. For added interest, you can read this entry again tomorrow and imagine new pithy remarks!